6.2 KiB
Homelab Docker Server
Version Information
The secrets will be set up progressively, taking into account the compatibility of each service.
This project configures a Homelab Docker server with a simple setup. In the future, more services will be added.
Project Inspiration and More Details
CrowdSec
Project Architecture Inspiration and Authentik Documentation:
- GitHub - hhf
- Thanks to @hhf
Initial Setup
-
Rename the
.env.examplefile to.env. -
Fill in the variables in the
.envfile:DOMAINNAME: Domain name.TZ: Time zone.- Create an account on CrowdSec (free).
- Create a secret with the API key generated on Cloudflare for Let's Encrypt. See the tutorial here.
- Add the Cloudflare API key to
/secret/cf_dns_api_token.
-
Generate the secrets for Authentik:
Secrets to Create
The following secrets (defined in the base compose.yaml file) need to be created:
I recommend creating secrets with the following syntax:
echo -n 'VALUE_CHANGEME' > SECRET_NAME_CHANGEME
Check out Traefik's info at https://doc.traefik.io/traefik/https/acme/#providers. Cloudflare specific information: https://go-acme.github.io/lego/dns/cloudflare/
cf_emailcf_dns_api_tokenecho -n 'CHANGEME@gmail.com' > cf_email echo -n 'CHANGEME-LONGAPI-CHANGEME' > cf_dns_api_token
Specific to Authentik (https://docs.goauthentik.io/docs/installation/docker-compose#preparation)
authentik_postgresql_dbauthentik_postgresql_userauthentik_postgresql_passwordauthentik_secret_keyecho -n 'authentik_db' > authentik_postgresql_db echo -n 'authentik_user' > authentik_postgresql_user openssl rand 36 | base64 -w 0 > authentik_postgresql_password openssl rand 60 | base64 -w 0 > authentik_secret_key
Create a Gmail account and enter the information:
gmail_smtp_usernamegmail_smtp_passwordecho -n 'CHANGEME@gmail.com' > gmail_smtp_username echo -n 'CHANGEME' > gmail_smtp_password
Go to https://dev.maxmind.com/geoip/geolite2-free-geolocation-data to generate a free license key (https://www.maxmind.com/en/accounts/current/license-key) for use.
geoip_account_idgeoip_license_keyecho -n 'CHANGEME' > geoip_account_id echo -n 'CHANGEME' > geoip_license_key
-
Let's Encrypt Configuration in
/appdata/traefik/config/traefik.yaml:Development Mode
- During installation, ensure the line
caServer: https://acme-v02.api.letsencrypt.org/directoryis commented out. - Replace
CHANGEMEwith your email.
Switch to Production:
- Delete the
acme.jsonfile in/appdata/traefik/data/. - Uncomment the line
caServer: https://acme-v02.api.letsencrypt.org/directoryin/appdata/traefik/config/traefik.yaml. - Restart the project to obtain a production SSL certificate.
- During installation, ensure the line
Project Launch
-
Start the project:
Navigate to the
/my-compose/folder where thedocker-compose.yamlfile is located, then run the command:docker compose up -d -
Check the services:
To check if all services are active, run:
docker psTip: To read the logs of a specific container, use:
docker logs 'container_name' -
Add the security engine on CrowdSec:
- Go to CrowdSec, click on "Add Security Engine," and copy the token displayed after
sudo.
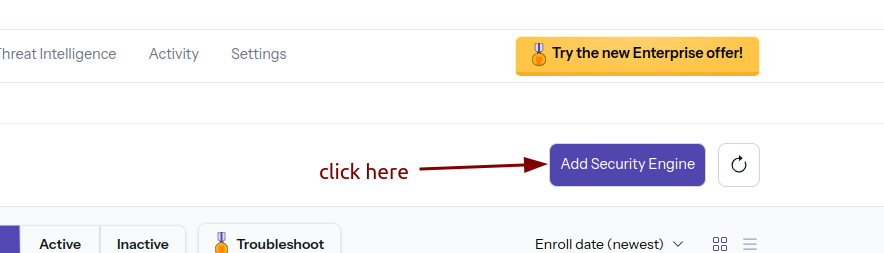
- Go to CrowdSec, click on "Add Security Engine," and copy the token displayed after
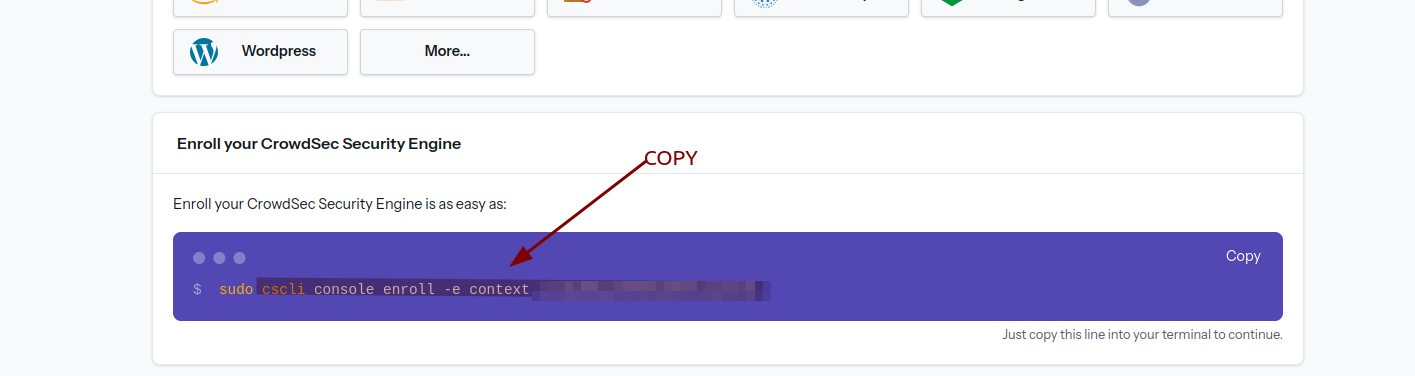
-
Run the following command in the terminal:
docker exec crowdsec cscli console enroll -e context 'retrieved token'
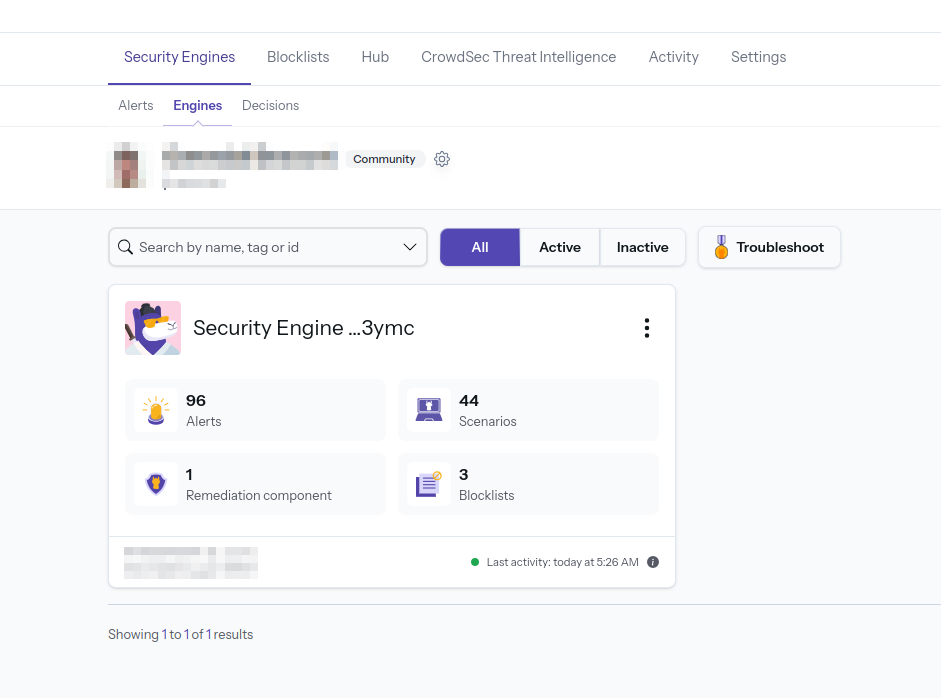
-
Return to the CrowdSec website:
- In the "Engines" section, accept the invitation. You should see an active item appear.
-
Create the Traefik bouncer:
To allow CrowdSec to read Traefik logs, run:
docker exec crowdsec cscli bouncers add traefik-bouncer -
Add the API key:
- Copy the generated API key and set the variable
CROWDSEC_TRAEFIK_BOUNCER_LAPI_KEYin the.envfile located in/my-compose/.env.
- Copy the generated API key and set the variable
-
Restart the project:
docker compose up -d --force-recreate -
Wait a few minutes for the CrowdSec service to activate:
- After a few minutes, you should see the active page on the CrowdSec web interface.
Additional Information
-
Logs: To read the startup logs of CrowdSec or Traefik, use the following commands:
docker logs --tail 100 -f traefikdocker logs --tail 100 -f crowdsec -
If errors occur: Delete the
configfolder and restart the services with:docker compose up -d --force-recreateIf that fails, delete the
appdata/crowdsec/dbandappdata/crowdsec/configfolders and restart the setup from scratch (bouncer + add engine). -
Add a database other than SQLite:
- First, launch the project with SQLite.
- Follow the tutorial CrowdSec database custom.
- Edit the file
appdata/crowdsec/config/crowdsec/config.yaml. - Delete the
appdata/crowdsec/datafolder. - Reconfigure from scratch (engine + bouncer).
-
Available
csclicommands: Check the documentation here.
Qbittorrent (documentation coming soon)
To retrieve the Qbittorrent password: run the command
docker logs qbittorrent.
Servarr (documentation coming soon):
Authentik
Follow this documentation Authentik